Identity is a simple auth system and a great improvement over Simple Membership. If you’re new to it, this exercise should help you get started.
This exercise
What we’ll build: A simple auth controller using identity with login/logout actions for use by an SPA. GitHub:https://github.com/gldraphael/dotnet-identity-example
Tools:
- VS Code (or Visual Studio)
- dotnet CLI 2.x (requires dotnet 2.x SDK)
- MySQL (or Postgres / SQL Server)
Prerequisites:
- Basic understanding of ASP.NET Core
- Basic understanding of EntityFramework Core
Create the project
Paste the following self-explanatory block into your terminal after cding to an appropriate directory:
 1# Create the solution directory
 2mkdir dotnet-identity-example
 3cd dotnet-identity-example
 4
 5# Create the Web project using an empty webapi template
 6dotnet new webapi --name Web
 7
 8# Create a solution file and add the web project to it
 9dotnet new sln
10dotnet sln add Web/Web.csproj
11
12# Restore dependencies and run the project
13dotnet restore
14cd Web
15dotnet run
Browse to http://localhost:5000/api/Values and you should see a JSON response if everything worked well so far. (The webapi template adds a sample controller in Controllers/ValuesController.cs which is why this works.)
Setup VS Code (Optional)
Type code .. in the terminal to open the solution directory in VS Code. You’ll be prompted with a dialog saying: Required assets to build and debug are missing from ‘dotnet-identity-example’. Add them?
Answer Yes. This will add a .vscode folder with a build task and two launch configurations. You’ll now be able to use F5 to debug the application within VS Code. Just remember to open the solution directory everytime, not the project directory.
Visual Studio (Optional)
Just open the dotnet-identity-example.sln file with Visual Studio. You can now use F5 to debug as usual (Cmd+Return on VS for Mac).
Add the User Model
Add the User model that extends the IdentityUser class:
1public class ApplicationUser : IdentityUser
2{
3    [Required]
4    public string FullName { get; set; }
5}
In this case I’ve added only a FullName property to keep things simple. In case you need more properties for a user (eg. DateOfBirth), this is where you need to add them. Fields like the Id, UserName, Email, PasswordHash, etc. are defined in IdentityUser, so you don’t need to re-define them. Here’s the source.
You can also subclass the IdentityRole class if you’d like to customize it with additional fields. IdentityRole.cs source.
Now add an empty ApplicationDbContext with the appropriate constructors as follows:
 1public class ApplicationDbContext : IdentityDbContext
 2{
 3    public ApplicationDbContext()
 4    {
 5
 6    }
 7
 8    public ApplicationDbContext(DbContextOptions options)
 9        : base(options)
10    {
11
12    }
13}
Notice how the ApplicationDbContext class extends IdentityDbContext<>. IdentityDbContext<> declares the necessary tables (as DbSet<>s) required by Identity, including the tables for Roles, Claims, Logins, etc.
Check IdentityDbContext.cs and IdentityUserContext.cs for more information.
Configuring EF
Configuring the database
First, add the ConnectionStrings block to the appsettings.Development.json file’s root object:
1"ConnectionStrings": {
2    "database": "your-connection-string-here"
3},
Remember to put your connection string in there. I’m using MySQL and my appsettings file looks like this.
I’ve tried and added steps for a few database providers. You should be able to figure your preferred (relational) database out, even if it’s not on the list. This post assumes that you already know to configure EF anyway 🙃
Installing the nuget package for MySQL / Postgres
Ensure you’re in the Web/ project directory and type the following:
1# For MySQL
2dotnet add package Pomelo.EntityFrameworkCore.MySql
3
4# For Postgres
5dotnet add package Npgsql.EntityFrameworkCore.PostgreSQL
6
7# Restore the nuget packages
8cd ..
9dotnet restore
Registering the DbContext
Register the ApplicationDbContext we wrote earlier, as a dependency. Add the following to the beginning of ConfigureServices() in the Startup.cs file:
1services.AddDbContext(
2    options => options.UseSqlServer(Configuration.GetConnectionString("database")),
3    ServiceLifetime.Scoped);
- For SqlLite replace
UseSqlServer()withUseSqlLite(). - For an InMemory database for testing replace
UseSqlServer()withUseInMemoryDatabase(). I do not recommend using it for this exercise because you won’t be able to query the database and see what’s happening. - For MySQL use
UseMySQL()instead. - For Postgress use
UseNpgsql().
Creating the tables
Add a DotNetCliToolReference to the Web.csproj file for dotnet ef commands to work. The <ItemGroup> with <DotNetCliToolReference> tags should look something like this (with the first child element being the one I manually added):
Here’s the diff with the above change. This is also documented in Microsoft Docs here.
Run the following in the Web/ project directory:
1cd Web
2
3# Create a migration
4dotnet ef migrations add InitialCreate
5
6# Update the database with the migration
7dotnet ef database
You can confirm if it worked by checking your database. You should see 8 tables (including the _EFMigrationsHistory table).
Here’s a database diagram of the tables (excluding _EFMigrationsHistory) created using EF Core Power Tools by Erik EJ:
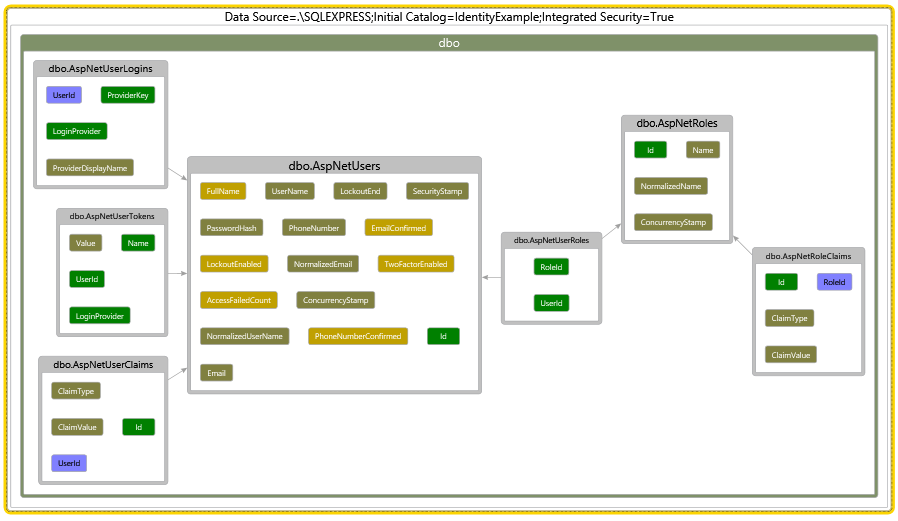 TableDescription
AspNetUsersUsers table to hold user related information.AspNetUserLoginsRepresents a login and its associated provider for a user.AspNetUserTokensHolds tokens issued by other services to users (social login services for example)AspNetUserClaimsUser related claims go here.AspNetRolesList of roles and associated information.AspNetUserRolesUser-role mapping table for a normalized many-to-many relationship.AspNetRoleClaimsRole related claims go here.
The tables are just an implementation detail. When using Identity, you would mostly use these classes:
ClassDescriptionUserManager<>For user related functionsRoleManager<>For role related functionsSigninManagerFor login / logout, password checks, etc.IdentityUser<>Represents the AspNetUsers table. Can be subclassed.IdentityRole<>Represents the AspNetRoles table. Can be subclassed.
All of these classes become available via DI once Identity has been configured and added as a service.
Configuring Identity
Configure and add the Identity service in the ConfigureServices() after registering the ApplicationDbContext:
 1// Configure Identity
 2services.AddIdentity(options =>
 3{
 4    // Configure identity options here.
 5    options.Password.RequireDigit = false;
 6    options.Password.RequiredLength = 6;
 7    options.Password.RequireLowercase = false;
 8    options.Password.RequireNonAlphanumeric = false;
 9    options.Password.RequireUppercase = false;
10})
11.AddEntityFrameworkStores(); // Tell Identity which EF DbContext to use
We now need to include authentication in our application pipeline by adding the following right before app.UseMvc() in the Startup.Configure() method:
1app.UseAuthentication();
By default Identity performs a 302 redirect to a login page for unauthenticated or unauthorized requests. While this behaviour is desirable for websites, an SPA might want to handle this locally. We can override the default authentication events by configuring the Application Cookie as follows:
 1// Configure the Application Cookie
 2services.ConfigureApplicationCookie(options => {
 3    // Override the default events
 4    options.Events = new CookieAuthenticationEvents
 5    {
 6        OnRedirectToAccessDenied = ReplaceRedirectorWithStatusCode(HttpStatusCode.Forbidden),
 7        OnRedirectToLogin = ReplaceRedirectorWithStatusCode(HttpStatusCode.Unauthorized)
 8    };
 9
10    // Configure our application cookie
11    options.Cookie.Name = ".applicationname";
12    options.Cookie.HttpOnly = true; // This must be true to prevent XSS
13    options.Cookie.SameSite = SameSiteMode.None;
14    options.Cookie.SecurePolicy = CookieSecurePolicy.None; // Should ideally be "Always"
15
16    options.SlidingExpiration = true;
17});
The ReplaceRedirectorWithStatusCode() method returns a no-content HTTP response with an appropriate HTTP status code:
1static Func, Task> ReplaceRedirectorWithStatusCode(HttpStatusCode statusCode) => context =>
2{
3    // Adapted from https://stackoverflow.com/questions/42030137/suppress-redirect-on-api-urls-in-asp-net-core
4    context.Response.StatusCode = (int) statusCode;
5    return Task.CompletedTask;
6};
You might also want to adjust the CORs policy to whitelist your domain for SPAs. Here are the steps.
Seed a default user
EF Core currently doesn’t currently support Initialization Strategies. For the sake of this exercise, we use UserManager<> and RoleManager<> to seed the users and roles.
First, let’s add an enum with three roles: Admin, Role1, Role2.
 1public enum Role
 2{
 3    Admin,
 4    Role1,
 5    Role2
 6}
 7
 8public static class RoleExtensions
 9{
10    public static string GetRoleName(this Role role) // convenience method
11    {
12        return role.ToString();
13    }
14}
Now we update the Main method to resemble the following:
 1public static async Task Main(string[] args)
 2{
 3    // Build the application host
 4    var host = BuildWebHost(args);
 5
 6    // Create a scope
 7    using(var scope = host.Services.CreateScope())
 8    {
 9        var userManager = scope.ServiceProvider.GetService>();
10        var roleManager = scope.ServiceProvider.GetService>();
11
12        // TODO: Add seed logic here
13        // For full code see: https://github.com/gldraphael/dotnet-identity-example/blob/master/Web/Program.cs
14    }
15
16    // Run the application
17    host.Run();
18}
Add the seed logic from here in place of the TODO.
Run the application. The seed data should be populated in the database. You can now run a quick query to check if the database was properly seeded:
1SELECT * FROM AspNetRoles;
2SELECT * FROM AspNetUsers;
3SELECT * from AspNetUserRoles;
So at the point, you’ve got Identity setup and some seed data populated.
The auth controller
Add the Login request ViewModel
Add a LoginViewModel class preferrably to a ViewModels/Auth folder in the project directory. The viewmodels will have the data required to perform a user login, which in most cases is a username (email address) and a password:
 1public class LoginViewModel
 2{
 3    [Required]
 4    [EmailAddress]
 5    public string Username { get; set; }
 6
 7    [Required]
 8    [DataType(DataType.Password)]
 9    public string Password { get; set; }
10}
Add the login and logout actions
Create an Auth controller in the Controllers folder:
 1[Route("api/auth")]
 2public class AuthController : Controller
 3{
 4    private readonly SignInManager _signInManager;
 5    public AuthController(SignInManager signInManager)
 6    {
 7        _signInManager = signInManager;
 8    }
 9
10    // POST: /api/auth/login
11    [HttpPost("login")]
12    public async Task Login([FromBody]LoginViewModel vm)
13    {
14        // Validate the requests
15        if (!ModelState.IsValid)
16        {
17            return BadRequest(); // TODO: Return error description
18        }
19
20        var result = await _signInManager.PasswordSignInAsync(
21            userName: vm.Username,
22            password: vm.Password,
23            isPersistent: true, // TODO: Get this from the viewmodel
24            lockoutOnFailure: true
25        );
26
27        if (result.RequiresTwoFactor)
28        {
29            return StatusCode(StatusCodes.Status501NotImplemented);
30        }
31        if (result.IsLockedOut)
32        {
33            return StatusCode(StatusCodes.Status423Locked);
34        }
35        if (result.Succeeded)
36        {
37            return Ok();
38        }
39
40        return Unauthorized();
41    }
42
43    // POST: /api/auth/logout
44    [Authorize, HttpPost("logout")]
45    public async Task Logout()
46    {
47        await _signInManager.SignOutAsync();
48        return Ok();
49    }
50
51}
Sending the following request should return a HTTP 200, and should set the application cookie:
1POST: /api/auth/login; Content-Type: application/json
2{
3	"userName": "[email protected]",
4	"password": "5ESTdYB5cyYwA2dKhJqyjPYnKUc&45Ydw^gz^jy&FCV3gxpmDPdaDmxpMkhpp&9TRadU%wQ2TUge!TsYXsh77Qmauan3PEG8!6EP"
5}
And sending the following should unset the cookie:
1POST: /api/auth/logout
If you now add the [Authorize(Roles = "Role1")] attribute to the ValuesController, those actions will now only be accessible to logged in users that belong to Role1. (Pro tip: use a custom authorize attribute to keep your code clean. Here’s how.)
Introduction to claims
Try the following:
- Login using the Login API we just created.
- Perform
GET: /api/values. It should work, if it doesn’t make sure that your HTTP client is sending cookies and try again from step 1. (Postman sends cookies out of the box.) - Now disconnect/shutdown/drop the database.
- Perform
GET: /api/values. It will still work. - Now perform a logout with
POST: /api/auth/logout. This will unset the cookie. - Now try
GET: /api/valuesagain, and you’ll see a 401. - You can’t login again until you turn the database on again (or recreate it using
dotnet ef database update), so please do whatever it takes to get things working again 😬
Notice how step 4 worked even though the database was disconnected? That route had an [Authorize(Roles="Role1")] which means that the role of the user accessing the API was being verified correctly without using the database. This was done using the claims present in the application cookie in the form of a bearer token.
Update the ValuesController.Get() method’s body with the following to return the user’s default claims:
1[HttpGet]
2public IActionResult Get()
3{
4    return Ok(User.Claims.Select(c => new {
5        c.Type,
6        c.Value
7    }));
8}
The User property used above is populated in the AuthenticationMiddleware we added to the pipeline using .UseAuthentication(). If you’re interested in the sources this is a good starting point: AuthenticationMiddleware.cs
GET: /api/values will now give a response similar to the following (you need to login using the login API first, ofcourse):
 1[
 2    {
 3        "type": "http://schemas.xmlsoap.org/ws/2005/05/identity/claims/nameidentifier",
 4        "value": "2b02fd68-d36e-4274-a1cd-a00a8bfcecd6"
 5    },
 6    {
 7        "type": "http://schemas.xmlsoap.org/ws/2005/05/identity/claims/name",
 8        "value": "[email protected]"
 9    },
10    {
11        "type": "AspNet.Identity.SecurityStamp",
12        "value": "e929e5b3-b4d6-4733-ad66-8f9ef7d965fc"
13    },
14    {
15        "type": "http://schemas.microsoft.com/ws/2008/06/identity/claims/role",
16        "value": "Admin"
17    },
18    {
19        "type": "http://schemas.microsoft.com/ws/2008/06/identity/claims/role",
20        "value": "Role1"
21    },
22    {
23        "type": "http://schemas.microsoft.com/ws/2008/06/identity/claims/role",
24        "value": "Role2"
25    }
26]
Notice how the roles of the user are present as claims?
You can also add custom claims and implement claims-based authorization. Claims can be attached to both Users and Roles. (Refer to the database diagram above and it’ll make sense.)
On a sidenote ASP.NET Core has a lot more authentication options out of the box compared to ASP.NET MVC 5. And you can use policies to mix and match. Super flexible if you ask me.
Next Steps
There’s a lot more I’d love to cover, but this post has already gotten too long. These should help you get going in the right direction:
- 📓 Read on ASP.NET Core’s underlying Auth System. Here’s a great article by David McCullough.
- 👩 Write APIs to manage users and their roles.
- 📰 Add social logins and try to understand how things are being handled.
- 🔑 The primary keys of Identity’s tables use GUID strings by default. Try using integers.
- ✉️ Email verification & 2FA.
- 🎫 Experiment with claims and auth policies.
- 🍪 Configure the app to use AntiForgery tokens since we’re uses cookies.
- 💡 Identity is open source. Dig into it for some aha moments. (Also check the ASP.NET Security project.)
- 🐞 Spot the bug in the seed logic and find out why it’s happening.
- 📱 Don’t send cookies to non-web clients. Also look into IdentityServer.
- 🚒 For the brave try replacing EF with something else like Dapper. Identity seems to be quite flexible, perhaps try getting it to work with a document based database like MongoDb using a custom implementation?
Also, Microsoft Docs is awesome and has Identity documented very well 🙌.
Update 12 Aug 2018: Get rid of the SeedController and perform seeding in the Main method instead.